Sleep Apnea Management for the Dentist
Course Number: 578
Course Contents
Delivery of the MAD
Inspect the MAD prior to patient arrival to ensure that the case was designed and fabricated as prescribed. Once the patient is in the chair, try the two arches in one at a time to ensure there is the right amount of retention. The patient should not be able to easily dislodge the appliance with their tongue. If the device seems over retentive or is impinging too much of the soft tissues then trim back with an appropriate lab bur to desired effect.
Now try and place the maxillary arch together with the mandibular arch and have the patient try to insert it into their mouth. Remind the patient that they will need to protrude their lower jaw forward to so their lower teeth can engage their appropriate place in the MAD. Start off at the 50% protrusion setting. Depending on MAD brand used, some patients can disengage if not advanced far enough forward. If this is the case, titrate forward another 1 mm and try again. Most MAD are delivered initially in the 50-70% maximum protrusion range.
You may consider starting at 50% with the notion that this would be most tolerable to the patient. It is advisable to do no further protrusions the first week to allow the patient to acclimate to the device. Develop an advancement plan with the patient. Depending on device type, this can be done every other night or once a week. Have the patient monitor their sleep quality.
Make sure the patient understands how to use the device and how to titrate it. If the device comes with a key, instruct them how to use it and how far each turn of the key advances the mandible. Give the patient limitations on how far to go. There is no need to go to 100% of maximum protrusion. Give the patient a sheet on what side effects to expect. This should be a refresher of what was given to them when the informed consent was signed. Note: It is important to wear the MAD ≥ 4 hours per night! Failure to do so results in incomplete management with continued sleep dysfunction along with continued risk for all the negative health consequences associated with OSA (Figure 16).
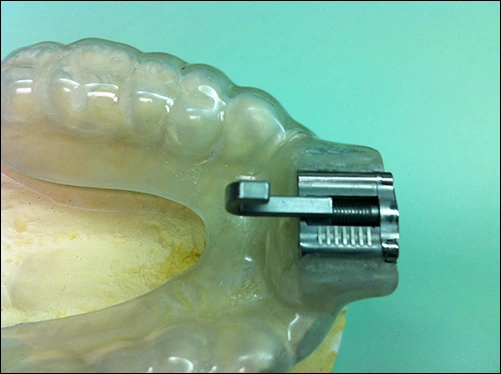
Figure 16.
Close up of the upper arch of a TAP appliance, an adjustable form of MAD. It is easy for patients to “get lost” when moving the hook back and forth. Thus, they need clear instructions on finding the proper setting. Note: the keyhole is on the anterior face of the metal advancement apparatus (at the far right).
Once fit and initial settings have been determined, have the patient wear the device in the chair for 5-10 minutes to check for tolerability. This will also serve as an introduction to the patient on how the device is to be worn.
Fabricate the morning repositioner at this appointment. Many MAD products include some type of repositioner or bite tab included with the kit. If there is none, instruct the patient to put steady pressure on their chin and push backwards on it for 1-2 minutes each morning. The purpose of this is to help reset the patient’s occlusion in the morning (Figures 17 and Figures 18A‑B).
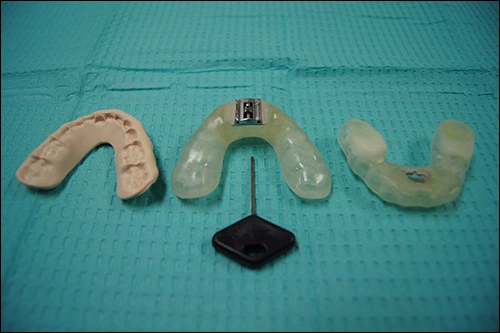
Figure 17.
The TAP3 MAD system. The appliance on the left is A.M. Aligner worn for 8 minutes to help restore the bite in the morning. The middle arch is the maxillary component that houses the advancement hook. The arch on the right is the mandibular component that houses a receptacle or sometimes a bar which engages the hook. The key is shown in the center as well. Each half turn towards the patient’s left ear advances the mandible 0.25 mm.
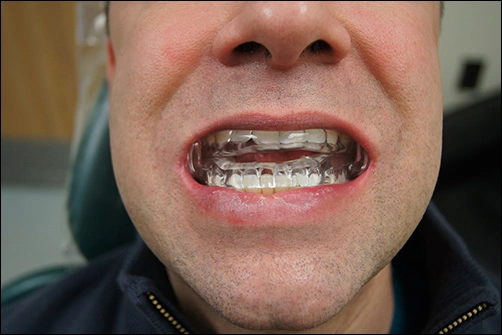
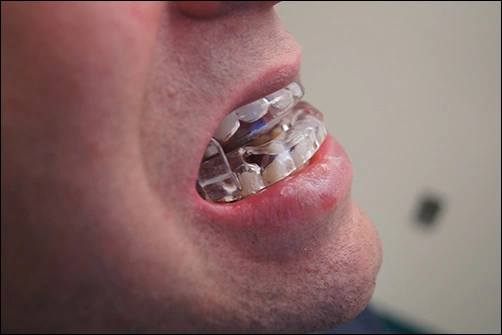
Figure 14. Anterior (A) and sagittal (B) views of an adjustable MAD (MicrO2) set at 60% of patient’s maximum protrusive range of motion.
A. Anterior view.
B. Sagittal view.
Figure 14. Anterior (A) and sagittal (B) views of an adjustable MAD (MicrO2) set at 60% of patient’s maximum protrusive range of motion.


